Add Inputs to Audio Interface: A Step-by-Step Guide 🎛️
Are you (perhaps) seeking to expand your audio interface capabilities without shelling out thousands for new unit? You've come to the right place! In this guide, we'll explore how to add inputs to your audio interface using ADAT optical connections: this method allows you to significantly increase the number of inputs and outputs available for your recording setup. However, it's important to consider the compatibility of your current equipment, because not all interfaces support ADAT. Although this method can enhance your system's functionality, you must ensure that everything works harmoniously.
Step 1: Understanding ADAT Optical Connections 🔌
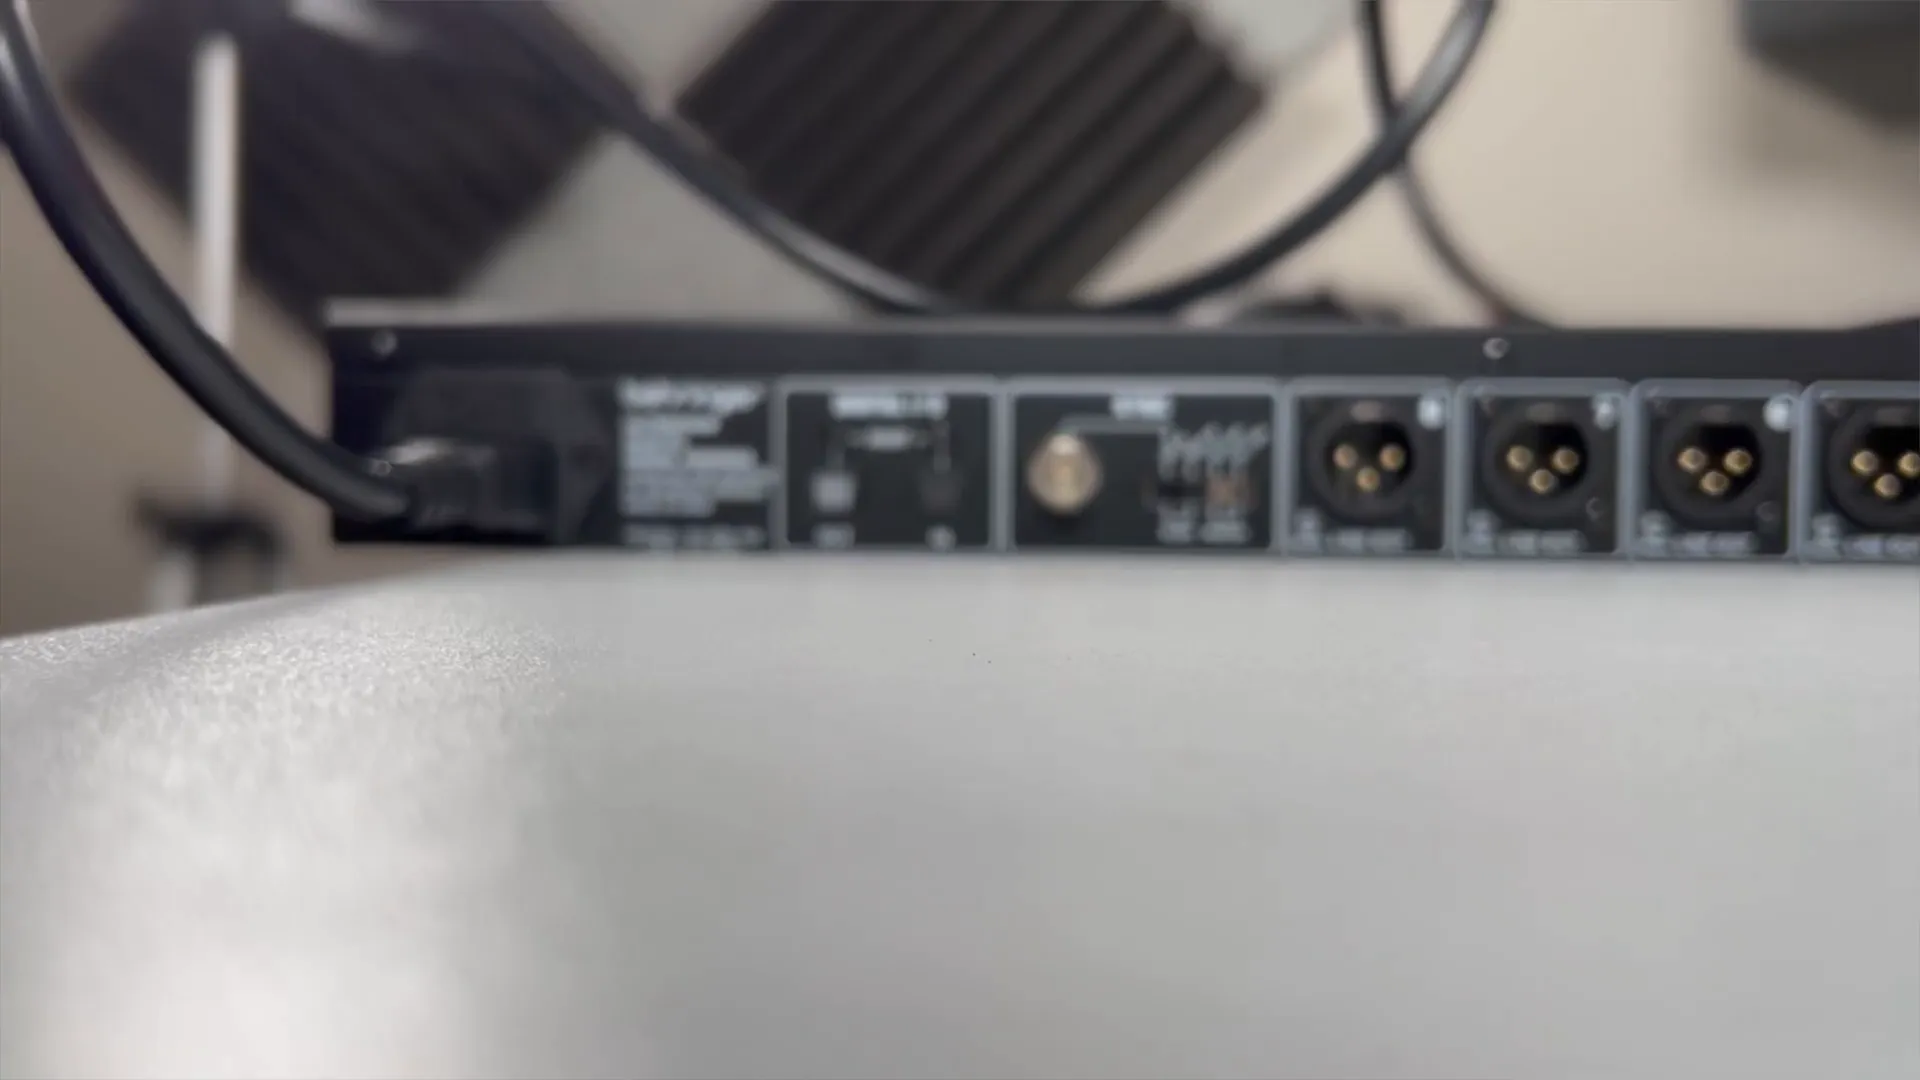
ADAT (Alesis Digital Audio Tape) refers to an optical interface that enables transfer of digital audio data. Many modern audio interfaces include optical input—often a small flap on back of the unit—allowing for additional expansion options; however, some users might find it confusing. Although this technology is widely adopted, it can be limiting because not every device supports it. This creates a need for compatibility considerations.
Most mid-tier (and high-end) audio interfaces come equipped with this feature: by utilizing it, you can increase your input count (without the need) to invest in a completely new interface. However, some may find it challenging to fully grasp the potential of such a tool. Although it offers advantages, the implementation might (at times) be cumbersome for users. But this doesn't detract from its utility, because many have successfully expanded their setups.
Step 2: Identifying Your Interface's Limitations ⚠️
Utilizing ADAT (Alesis Digital Audio Tape) presents numerous benefits; however, certain constraints exist that warrant consideration: for instance, its compatibility issues can be problematic. Although this technology is widely recognized, it may not suit every application. Additionally, the potential for signal degradation is a concern, because maintaining audio quality is paramount. Thus, users must weigh these factors carefully.
- Sample Rate Limitation: ADAT can support up to eight channels at 44.1 kHz or 48 kHz. If you want to exceed this sample rate, you will need to reduce the number of channels used.
- Input and Output Requirements: Some interfaces, like the Apollo Twin, only have an optical input. This means you can add extra inputs but not outputs. If you need both, ensure your interface has both optical in and out options.
Step 3: Choosing the Right Hardware 🛠️
To successfully add inputs to (your) audio interface, you will need (1) the following hardware: however, you must also consider (2) compatibility issues. Although the requirements may seem straightforward, you might encounter challenges if the equipment does not meet specifications. This is because certain devices may not function as expected and (3) it's crucial to verify that all components are suitable. Because of these factors, planning ahead will prove beneficial.
- An Audio Interface: Ensure it has an optical input, and ideally both input and output.
- ADAT Interface: A unit like the Behringer ADA8200 is a popular choice for expanding input capabilities.
- Optical Cable: A standard optical cable will suffice for connection, but ensure it is compatible with your devices.
- Additional Cables: XLR or jack cables will be necessary to connect your instruments or audio sources to the ADAT interface.
- Power Supply: The ADAT interface will require its own power source, so make sure you have an available outlet.
Step 4: Setting Up Your Audio Interface 🖥️
Now that you possess necessary hardware, it's time to configure everything (up): however, ensure that you follow the instructions carefully (because) this will prevent any potential issues. Although it may seem straightforward, some steps can be easily overlooked. You must pay attention to details; (for) example, connections can be tricky. But once it’s all arranged correctly, you will appreciate the effort.
- Connect your ADAT interface to your audio interface using the optical cable.
- Power up the ADAT interface and ensure all connections are secure.
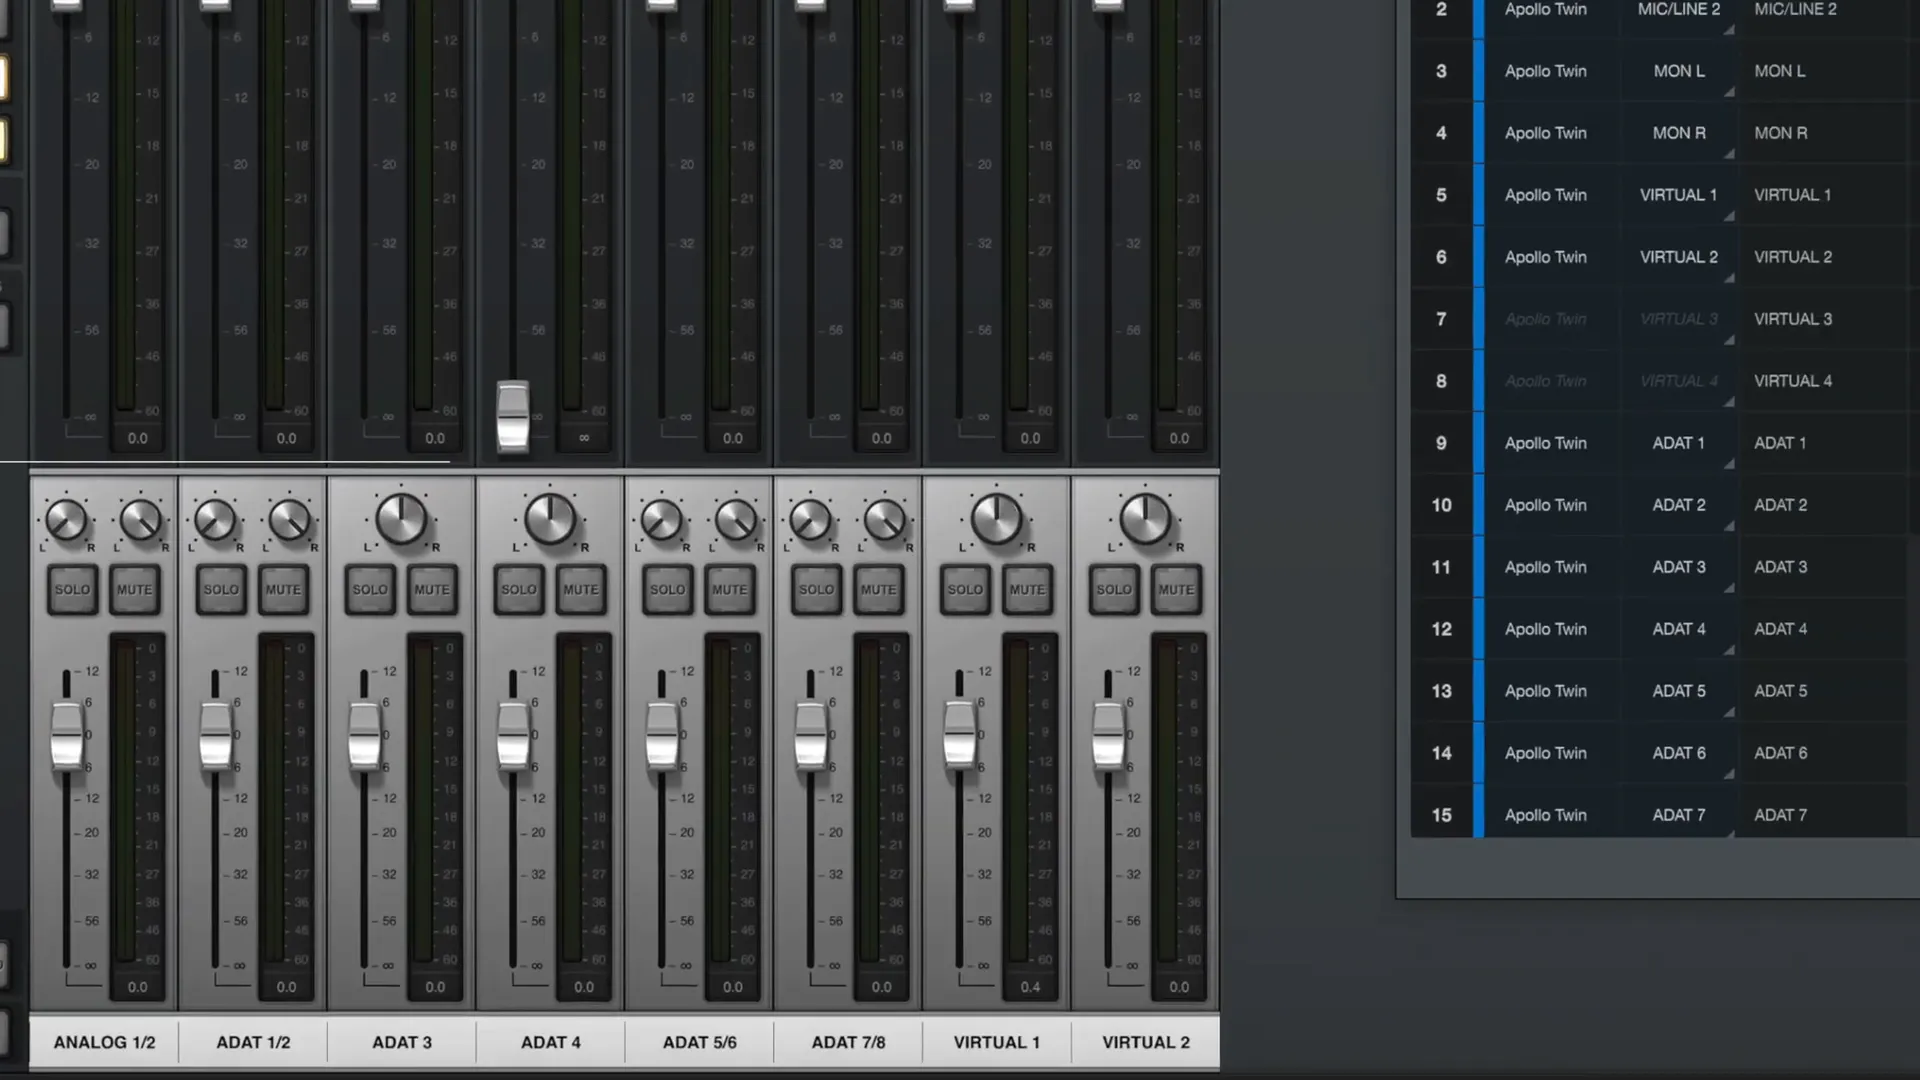
- Open the management software for your audio interface. For example, if you have an Apollo, you would use the Universal Audio console software.
- Set the clock source to ADAT within the console software. This allows the ADAT interface to send clock signals to the audio interface.
- On the ADAT interface, set the sample rate to match your desired recording quality (usually 44.1 kHz).
Step 5: Configuring Input and Output Routing 📊
Once everything (is) connected and the software is configured, you can route your inputs (and) outputs; however, you must pay attention to the settings. This process (is) essential because it ensures optimal performance. Although it may seem straightforward, some complexities can arise. You might encounter unexpected issues—this can be frustrating (but) it's important to remain calm and methodical. Remember, every detail (matters) when dealing with such configurations.
In (the) console software, you should (indeed) see additional input channels: e.g. ADAT 1-8. You can now assign these channels to different instruments (or audio sources); however, this requires careful consideration. Although it may seem straightforward, it is essential to ensure compatibility. Because of this, pay attention to settings when making adjustments.
If you possess (1) MPC connected to one of the ADAT inputs, you can transmit audio from that device to your DAW for recording. However, it is important to consider (2) the potential limitations of this setup, although many users find it effective. Because of its versatility, this configuration is favored by countless producers. Yet, some may encounter challenges while integrating various devices.
Step 6: Troubleshooting Common Issues 🔧
If you encounter issues (during setup), there are several common troubleshooting steps to consider: however, it is essential to remain patient. First, verify your connections (ensure everything is plugged in correctly) because sometimes cables may be loose. Second, check the software settings—this is crucial (errors often stem from misconfigurations). Although some may overlook this aspect, it can make a significant difference. Furthermore, restarting the device (or the system) can resolve many problems. Finally, if issues persist, consulting the manual or seeking online resources could prove beneficial, but do not hesitate to reach out for additional help.
- Ensure all cables are securely connected.
- Check that the clock settings on both your audio interface and ADAT interface match.
- Restart your audio interface and computer, as sometimes a simple reset can resolve connectivity issues.
FAQs About Adding Inputs to Audio Interfaces ❓
Q: Can I use any optical cable for my ADAT connection?
A: Yes (as long as the cable is compatible with optical ports on your devices). However, this compatibility can vary depending on the specific models. Although most cables work seamlessly, there are exceptions (due to different standards). But, it is essential to check the specifications of both the cable and the devices before making a purchase, because this ensures optimal performance.
Q: Do I need special software for my audio interface?
Most audio interfaces (1) come with their own management software; this is necessary for configuring settings (such as clock sources and routing options). However, some users may find (2) it cumbersome. Although it is essential, not everyone appreciates the complexity involved. But, because of this, many opt for simpler solutions that may lack certain features.
Q: What if my interface only has an optical input?
You can still add inputs (however) you will not be able to add outputs unless you upgrade (to) an interface with both optical in and out; this presents a challenge (because) it limits functionality.
Step 7: Explore More Resources 📚
If you’re seeking to enhance your understanding (further), explore these resources: however, be mindful of their quality. Although they can provide valuable insights, not all are equally reliable. This is important because misinformation can lead to confusion. Numbers and statistics may be useful, but always verify the source. Ultimately, the pursuit of knowledge requires discernment (and critical thinking) to navigate effectively.
- Thomann feat. Unders - Warrior Sound – Thomann United States
- Musicians Guide To Streaming — Warrior Sound
- How to Expand Your Interface With ADAT
By (following) these steps, you can successfully add inputs to your audio interface—enhancing your music production setup without (breaking the bank). If you have any further (questions), feel free to reach out in the comments! However, this process can seem daunting at first; 1) it requires patience. Although many people think it’s easy, it can also be challenging. This is especially true for beginners, because they may not know where to start. But with enough practice and determination, you will master it.


Comments
Post a Comment